Tag: RECIPES
We’re busy ushering in the holidays across the Zingerman’s Community of Businesses with all sorts of seasonal favorites. The Bakehouse is baking loaves of Cranberry Pecan bread and the Coffee Company is brewing up batches of Holiday Blend coffee. The Deli is mixing up their house blend of Hot Cocoa Mix. Mail Order is busy shipping everything from heirloom turkeys to loaves of Chocolate Babka across the country.
While we’re looking forward to sharing all of those treats with you and yours, we also wanted to bring you a few of the dishes that help usher in the holidays for some of our Managing Partners. They’ll be whipping them for friends and family throughout the holidays, and now you can, too. And, since they’re all two-bite recipes, you can share and enjoy more of them!
A Holiday Recipe from the Bakehouse
We first created Espresso Stars for our most beloved BAKE! class, Fancy Schmancy Holiday Cookies, at the suggestion of Nikki Lohmann, one of our BAKE! Instructors. We started the class in December 2009, and have been teaching it every holiday season since, adding more sessions along the way—we now teach the class 100 times between Thanksgiving and Christmas! The combination of coffee, chocolate, and buttery shortbread was such a hit that, for a time, they made it into our regular line-up at the Bakeshop, Zingerman’s Coffee Company, and Zingerman’s Roadhouse.
This recipe can be found in our Fancy Schmancy Holiday Cookies cookbooklet, a bite-sized collection of some of our favorite cookies from the class over the years. I’m excited to share that it will also appear in Celebrate Every Day: A Year’s Worth of Favorite Recipes for Festive Occasions, Big and Small, our second full-length cookbook, which will be released in the fall of 2023. We packed it full with nearly 80 recipes, most of which have never been published, and included a number of guest favorites. We can’t wait to share it with you!
—Amy Emberling, Zingerman’s Bakehouse Managing Partner

These shortbread cookies are flavored with freshly ground espresso beans from Zingerman’s Coffee Company, making them a rather adult addition to a dessert line-up, both in terms of flavor and the little jolt of caffeine. We like the added help staying awake until the celebratory ball drops at midnight in New York City’s Times Square on New Year’s Day; but if you’d prefer less of a burst of energy, feel free to use decaf beans. (Just don’t be tempted to try and swap in instant espresso powder, which is designed to dissolve; we want both the flavor and the texture from the freshly ground coffee to be front and center.) To make them look as festive as they taste we partially dip them into chocolate, and make the effort to find gold luster dust or gold leaf to garnish them.
Chocolate-Dipped Espresso Stars
Makes 2 to 3 dozen cookies
1/2 cup (110 g) unsalted butter, room temperature
1/4 cup (50 g) granulated sugar
1/2 tsp fine sea salt
1 cup plus 1 Tbsp (150 g) all-purpose flour
2 Tbsp (10 g) espresso beans, finely ground
1 cup (170 g) semisweet chocolate, chopped
Gold luster dust or edible gold leaf (optional)
Make the cookies
- Preheat the oven to 300°F (150°C).
- In a medium mixing bowl, cream together the butter, sugar, and salt until sugar is well mixed in.
- Add the flour and ground espresso beans and mix until the dough holds together. If necessary, use your hands to gently knead the dough together into a ball.
- On a lightly floured surface, roll the dough out to 1/4-in (6 mm) thick. Cut out cookies using a 1 1/2- to 2-in (4- to 5-cm) star cutter. You can reroll scraps and cut out more stars, but take care not to overwork the dough. This cookie will be delicious in many different sizes and shapes. Use what you prefer and what you’re able to find. If you choose a much bigger cutter, leave them a little thicker. If they are large and too thin they will break easily.
- Carefully place cut cookies on a baking sheet lined with parchment paper, evenly spaced about 1 in apart.
- Bake for 30 minutes. The tops should look dry and cookies should be slightly browned. Cool on the baking sheets for 5 minutes, then transfer to a rack to cool completely to room temperature before dipping in melted chocolate.
Garnish the cookies with melted chocolate
- Melt the chocolate slowly in the microwave or over a double boiler until just melted.
- Dip 1/3 of each cookie into the melted chocolate, then place onto a baking sheet lined with parchment paper. If you have gold leaf use a couple of small pieces as garnish and apply them to the soft chocolate. Let the cookies sit at room temperature until the chocolate hardens.
- If desired, lightly brush gold luster dust over the hardened chocolate.
Storage:
Store the cookies in an airtight container, with parchment paper between layers of cookies, at room temperature for up to a week or in the freezer for up to 2 months. Thaw frozen cookies at room temperature before enjoying. If thawing cookies with luster dust, do so gradually, moving them from the freezer to the refrigerator, and then to room temperature.
Tip!
Luster dust is a type of decorating powder used to add color and sparkle to cakes, candy, cookies, and other sweet treats. It’s available in stores that sell cake decorating supplies or online, as is edible gold leaf.
A Holiday Recipe from the Deli
You definitely know it’s the holiday season when you start smelling Spiced Pecans in the Deli kitchen. Every batch is made by hand and bagged right at 422 Detroit Street. We get the pecans from the South Georgia Pecan Company in Valdosta, Georgia, and use a spice blend we make ourselves using Épices de Cru spices.
There is a disco dancing spiced pecan cartoon on our Spiced Pecan bag and a few years back we figured out we could print them with sparkly red ink. Nick Jaroch painted a poster of this pecan guy with glittery pants that is one of my favorite pieces of merchandising ever at the Deli. We like to make big, bountiful displays of these bags all over the Deli. Like hanging tinsel on your tree, it’s festive and fun and you know the holidays have arrived.
—Rodger Bowser, Zingerman’s Deli Managing Partner
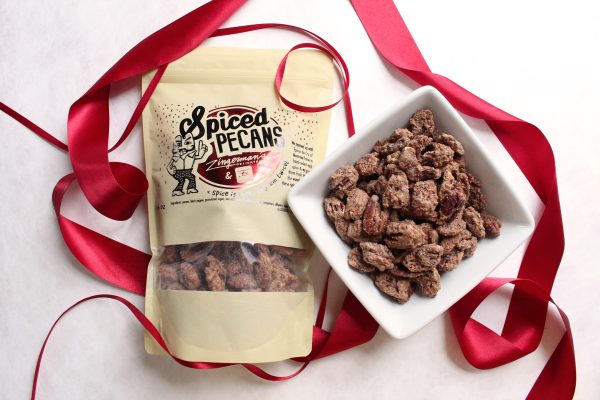
Spiced Pecans with Apples & Cheddar
Pick up a bag of Zingerman’s Deli Spiced Pecans, crisp local apples (like from Nemeth Farms in Milan or Kapnick Orchards in Britton), and a block of cheddar—you can’t go wrong with Nor’Easter Cheddar from Cabot, but the new cheddars from Deer Creek in Wisconsin are also pretty fabulous. Put these three items on a tray and viola! A simple, yet delicious combination that’s sure to win over your kids, neighbors, or a crowd!
A Holiday Recipe from Mail Order
Zingerman’s Mail Order does half its years’ business in the month of December. That kind of surge is as crazy as it sounds. We go from a nicely busy business to a rather insane business. Our staff quadruples. Food and boxes fill our warehouse to the rafters. Trucks and people and conveyors are constantly in motion. The operation runs 24/7. It’s kind of nuts. I’ve known no other version of December for the past two and a half decades, it’s a really strange yet exhilarating way to spend the holidays.
—Mo Frechette, Zingerman’s Mail Order Managing Partner
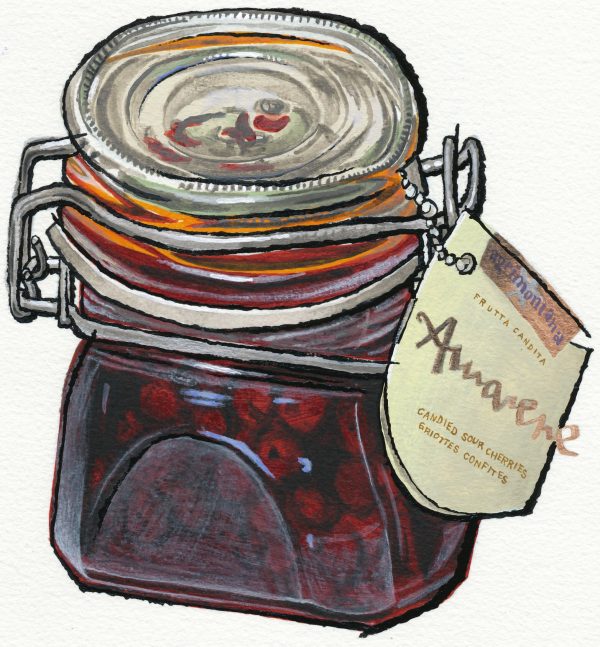 Preserved fruits, candied fruits, fruit cakes—they all say the holidays are here. They’ve been part of festive eating for centuries. For me, outside of jam on toast, I rarely eat fruits like this from January through November. But I crave them in December. Agrimontana’s Italian cherries are the handcrafted, flavorful alternative to the ubiquitous blue and white jars of Amarena cherries you see at cafes. They taste of dark fall fruit, sweetened in their purple syrup. Combining them with chalk white Brabander goat gouda is stunning to look at and, frankly, a blast to eat. I think of Brabander as the milkshake of cheese—creamy, sweet, and easy to eat. Why not have a cherry on top?
Goat Gouda with Wild Cherries
Spoon one or two Agrimontana wild cherries from the jar and drape them on a thick shard of Brabander Goat Gouda cheese.
Originally published in the November/December 2022 Zingerman’s Newsletter
An appetizer for the ages
In May, I traveled to Turin, Italy, to learn about the food and cooking of the Piedmont region, where I found a bunch of good things. Stay tuned for more. But one I can’t get out of my mind is the simple combination of anchovies and butter. Unsalted butter with top-notch anchovies. On good bread, man, it’s delicious. It’s really one of the tastiest culinary combos I’ve had in a long time!
Nils Bohr, the physicist who also wrote wonderfully about the quiet and effective power of the dialogue process, once said, “The opposite of a correct statement is a false statement. But the opposite of a profound truth may well be another profound truth.” Acciughe e Burro is just that—the coming together of two seemingly opposite, but equally profound in their excellence, culinary truths. It’s a marvelous, well-cured and well-curated take on Surf and Turf—Surf and Turf—the salty sea tang of good anchovies and the creaminess of high quality, cultured, butter. As one might say in Italy, “bellissimo!”
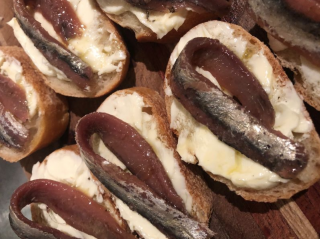
Acciughe e burro is all about the quality of the raw materials. Pick up some really great butter—cultured butter (not “sweet butter”—cultured butter is the old school style where the cream is allowed to ripen for a few days, like good yogurt), spread thickly, onto good bread. The Deli has the 1889 brand of cultured butter from the Piedmont in stock—it’s excellent! I’ve been putting it on a French baguette from the Bakehouse, but really any of the breads would be excellent. (Those great chestnut baguettes for sure, as well the lovely Country Miche.) Then lay on some really good anchovies. Right now, the Gran Anchoa Ortiz anchovies from the Spanish Basque Country would be my top pick! If you want, you can stick a caper berry or a tiny sprig of flat leaf Italian parsley on it, or maybe a grind of good black pepper but that’s about it. Let the ingredients come to room temperature before you eat. Put a bunch out on a plate and have at it. Really, there’s just something about the creamy dairy deliciousness of the butter paired with the umami excellence of the anchovies that makes this so good that I can barely stop eating it!
Having eaten this regularly in Turin, it got me thinking about the origins of the dish. I have found little so far (though, you can be sure, I’ll stay on the search for a while still) about its history. It seems to me it would have to be a northern dish—people in the south of Italy would hardly ever have eaten as much butter in the old days, so it would make way more sense to have had its origins in a northern, dairy-rich region like Lombardy, Emilia Romagna, or the Piedmont. For the moment, I’m going to believe its beginnings are Piemontese—the region has a long tradition of anchovies. The story is that at various points in the past (some say centuries ago; one anchovy curer told me last week it was during WWII) salt was hard to get in the region and was also heavily taxed. In the way that Italians have with creatively getting around any rule, some smuggler figured out a way to top off boxes of salt with anchovies. Eventually, someone realized the anchovies were worth more than the salt. To this day there’s a host of anchovy-heavy dishes in this region which is odd, since the Piemonte has no ocean front property! My friend and food writer Elizabeth Minchilli says, “It’s definitely a northern thing since it combines butter (north) with a fish that’s preserved, not fresh. That said, it’s something you find all over Italy these days and is considered a delicacy. For instance, in Puglia, it’s always part of a ‘fancy’ antipasto spread in any restaurant. It’s also common in Rome, where Romans order it as an appetizer even when it’s not on the menu.” So there you have it! If you don’t already know it, and if you’re inclined towards anchovies (like I am) anyways, make this your go-to appetizer of the year!
The unsung hero of the culinary world is most certainly vinegar. Often undervalued and dismissed as unimportant, vinegar can be an afterthought when you’re cooking. In reality, it’s a secret weapon in your kitchen arsenal that helps unlock the subtle hidden flavors.
Vinegar is, in my opinion, one of the best ways to add more diverse and complex flavors to almost any dish. Ari, our tastemaker here at Zingerman’s, wrote a great piece about the importance and impact of salt levels in cooking, and I’d like to nominate vinegar as the second most important secret ingredient.
I am infatuated with vinegar. I always have 5-7 different kinds in my pantry to accent the food and drinks I enjoy at home. I find it sad that vinegar isn’t more respected when people are filling their cupboards.
Adding a splash of acidity with vinegar is another trick you can call upon to make flavors stand out and leave all your friends wondering about why your cooking is so darn tasty. For example, adding a little Banyuls wine vinegar to my chili and adding a splash of the Lobato sherry vinegar to my bean soup takes things to the next level.
The wine connection
Vinegar is the lesser known, more flavorful, yet often ostracized cousin of many amazing vintners (winemakers). The same deep and nuanced knowledge we have about wine flavors also apply to vinegar. The types of grape varietals, the ripeness of the harvest, the elevation of the vines, the name and style of the acidifier, the blending and the process of fermentation, all impact the nuanced flavor characteristics available in both wine and vinegar.
The better the original grape and the wine, the better the vinegar. In Europe, many of the best wine producers also make vinegar. A good friend of mine and a wonderful distributor of French and Spanish food, Kitty Keller, often goes to wine shows abroad and asks the vintners about their vinegar. Most have a bottle in the back, under their table – not out for general display. This is a great way to find exceptional vinegar! This isn’t the case in the U.S., however – most U.S. winemakers don’t want vinegar anywhere near their wine production.
Range of flavor
Vinegar can be sweet or savory and can range from mild to bold acidity. Using a small amount of a bold vinegar adds a ton of flavor. There’s a group of vinegar makers in Italy, one of which is San Giacomo, that refuse to water down its vinegar. These vinegars are all naturally fermented and loaded with flavor. Other vinegars are diluted with 20 to 40 percent water to lower acidity and extend vinegar yield.

Some of the sweeter types of vinegars include:
- Balsamic – A true, barrel-aged balsamic vinegar has a beautiful, rich sweetness to it
- Pedro Ximenez – A dark, sweet fortified wine from Spain
- Agrodolce – A lighter-bodied, fruity vinegar that can also be from the balsamic region, made from white grapes
Similar to selecting a wine made from a specific grape, individual grape varietals are also present in vinegar. Here’s a brief introduction to a few of my favorite vinegars, all of which are available in the Deli’s retail space.
- Katz Zinfandel & Sauvignon Blanc Vinegar – The Katz Zinfandel made in California is one of my favorites. It has the big, jammy, grapey sweetness of a Zinfandel wine with a balanced amount of acidity and tartness. The Katz Sauvignon Blanc vinegar features the bright, grassy flavors you’d expect in a great wine.
- Rozendal Hibiscus Vinegar – If you want to experience a slightly sweeter, full-flavored vinegar you should try the botanical vinegars made in South Africa by Rozendal – hibiscus is a best seller!
- Gardeny Vermouth Vinegar – This vermouth vinegar, made under the Gardeny label using the Schützenbach method of production is one of the many unique Spanish vinegars we carry.
- O Med Yuzu Vinegar – A wonderful, citrusy vinegar! Yuzu has lower acidity and more stimulating aromatics than our western citrus. Incredibly versatile, yuzu olive oil brings out the natural flavors beautifully.
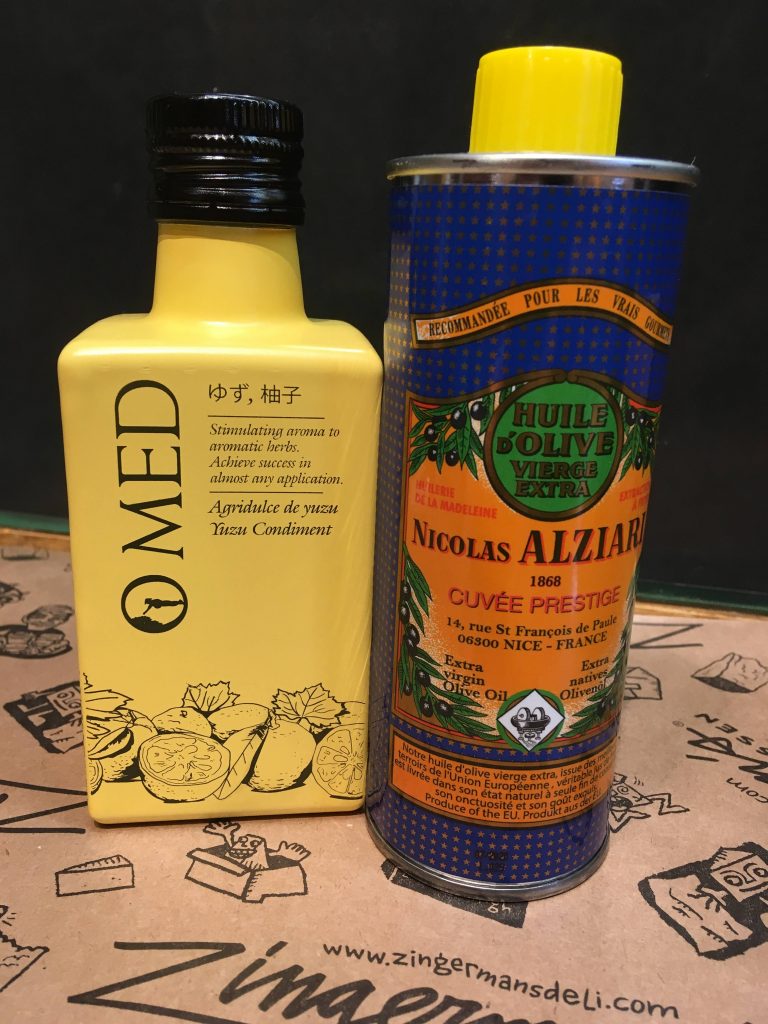
The O Med Yuzu vinegar comes in the brightest, most beautiful sunflower yellow bottle. You’ll want to leave it out on the counter and show it off! Fun, beautiful bottles always make me smile when I cook. A great partner for this vinegar is the Alziari olive oil from France. The buttery and silky French olive oil pairs well with the citrusy notes of Yuzu and comes in a stunning blue bottle that you can usually find on display in my kitchen. Just by leaving the yuzu vinegar and Alziari olive oil on your counter, you’ll have your friends oohing & ahhing over your pantry.
How to use vinegar in your cooking
Whether you’re making a marinade for meat or fish entrees, a classic vinaigrette for a salad, a fresh vegetable slaw, splashing a little on the side of sauteed vegetables, or just want to drink something refreshing after a long day at work, vinegar can add to and enhance the flavors of most any dish – including dessert. Here are a few of my favorite vinegar applications:
Mocktails
I love making mocktails with vinegar. In addition to the varied health benefits attributed to drinking traditionally-made vinegar, vinegar mocktails are also a good way to drink something fun in a non-alcoholic form. I often like to take a break from drinking alcohol, but I get really bored with drinking just water, and I don’t like to drink too many sweet sodas. To keep my non-alcoholic drinks fun, I always keep a bunch of soda water around and experiment with flavors using special vinegars and fresh herbs.
Sweet Honey Mocktail
If you like to experiment, try some fresh berries muddled with a little fresh mint and some of the Mieli Thun honey vinegar, and top it off with some soda water.
Cool Cucumber Mocktail
If you prefer something a little less sweet, a fresh peeled and seeded cucumber can be muddled with a little fresh thyme or rosemary and combined with the Navarino rosemary & thyme vinegar from Greece. Once you have your mix, top it with soda water and you’ve got a cool, refreshing beverage!
Marinades
Many roast marinades aren’t complete without a little vinegar. Play around with different combinations of red wine vinegar, olive oil, and fresh, ground spices to add some different flavors.

Vinaigrettes
I like to make a light vinaigrette to serve with fish dishes. Sauteed lake perch with a light cava vinaigrette adds a nice accent without overwhelming the delicate flavors of the perch. Putting a splash of the Balsamella vinegar (a thick cooked must vinegar made from apples by San Giacomo in Italy) on roasted, or boiled rutabaga. The sweetness of the apple flavor makes a nice contrast to the slightly bitter earthy flavors of the rutabaga.
Dessert
Fresh strawberry season is almost here. A great way to finish your day with something sweet is to drizzle a little balsamic vinegar over some strawberries. It’s a refreshing, slightly sweet treat that you can eat as it is or served over some vanilla gelato from Zingerman’s Creamery.
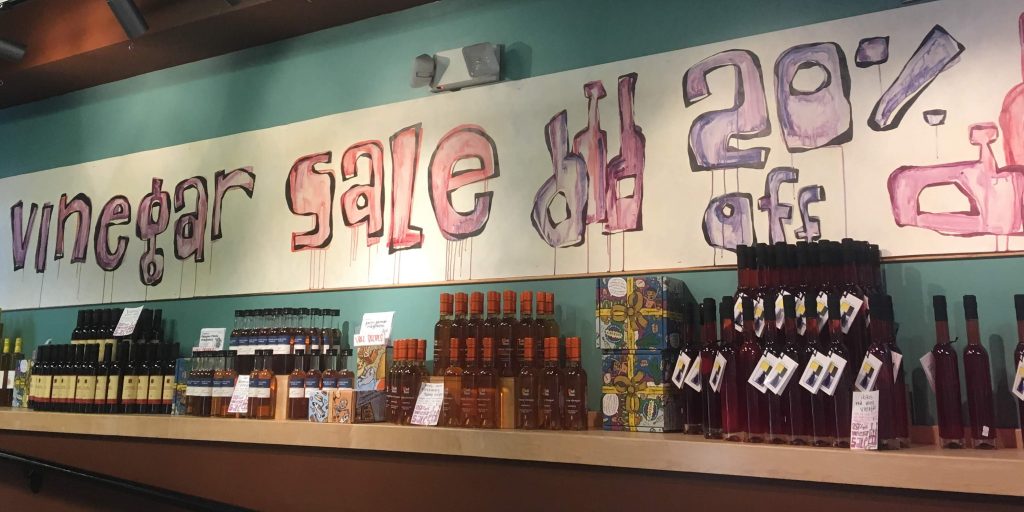
Stop into Zingerman’s Deli to taste a few vinegars and to have some fun experimenting at home! We have all of the Deli’s vinegars on sale for 20% off through June 15!
Also, at Zingerman’s Deli, you can sample any of our edible items, you just have to ask.
I have to admit that, for years, I had a reluctance to use “spice blends”. It was a carry over from when I realized that most of the spice blends on the market were really just a few sad dried up flavorless herbs blended with a lot of salt. Now I understood that the spices from Épice de Cru were different—that they sourced the best they could find, were committed to preserving the flavor, and presenting them in the best way possible. I even had some of their spice blends in my pantry, but I just wasn’t using them. That changed after I attended Ari’s Top Ten Spices tasting back in May during Spice Week, which is when I became inspired to start doing some experimentation.
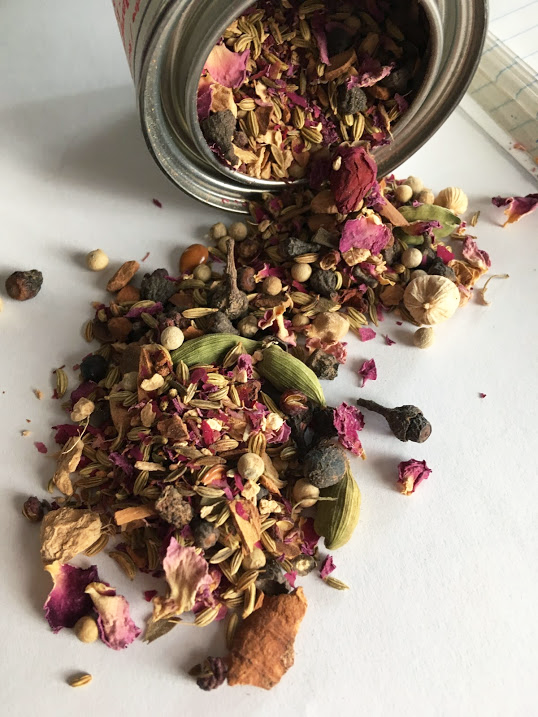
I decided to start with Silk Road Blend. The first time I saw and smelled this product I was compelled to buy a tin. It is such a beautiful mix of spices—you can see the red rose petals mixed in with the bright green of the cardamon and the orange brown of the cassia. It also contains ginger and fennel, cassis, star anise, long pepper, szechuan pepper, saffron, and cloves. Quite fragrant and beautiful! If you get to the Deli be sure to ask to smell a sample. I don’t think I can do it justice by describing it, but it’s exotic and enticing and transports me to other lands.
The first thing I had to figure out was how to grind the spices. The folks at Épice de Cru recommend using a granite mortar and pestle, but I haven’t yet invested in one that is large enough. However, I do have an extra electric coffee grinder tucked into one of my cabinets, so I decided to use it. This works great, but I found that I need to put in at least 2 tablespoons of the blend so there’s enough of the spices to grind. (With a mortar and pestle you can do a smaller portion). There is an upside to grinding a bit more spice though—I didn’t want it to go to waste, so it encouraged me to test out a few different recipes.
There’s so many ways to use this spice. Adding it to rice, and seasoning eggs with it are things I’ve tried, and I’m sure you’ll have other experiments in your kitchen with it. I hope you enjoy the three recipes below:
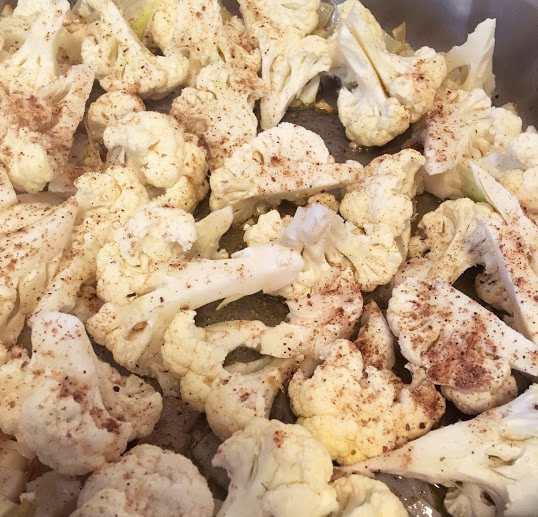
Oven Roasted Cauliflower with Silk Road Blend
1 head cauliflower, cut florets into 2-3” pieces
1 medium onion- diced ¼”
1 tbsp silk road blend spice- ground
Good quality salt such as Trapani Sea Salt from Sicily to taste
3-4 tablespoons Extra virgin Olive oil
Pre-heat oven to 375 F
Put cut cauliflower in a large bowl with the olive oil, silk road blend, salt, and olive oil. Toss to blend and thoroughly coat cauliflower.
Bake for 15 minutes, check to see if one side is more done than another, and if so rotate pan in oven. Continue baking for another 10-15 minutes depending upon desired doneness.
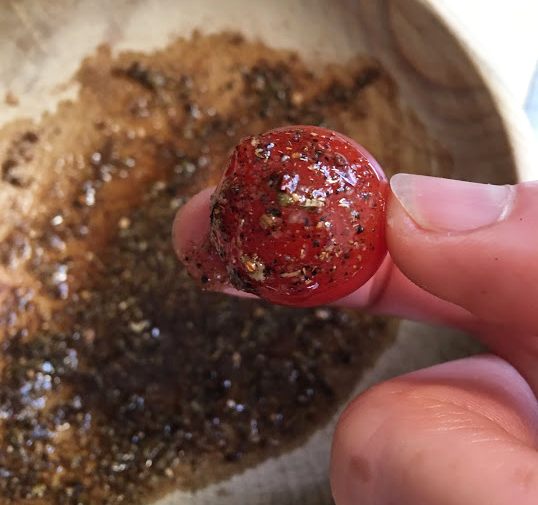
Silk Road Blend Dipping Sauce (for veggies or bread)
2 Tablespoons ground Silk Road Blend
¼-½ tsp. high-quality Salt
3-4 tbsp. extra virgin olive oil
This one’s very simple:
Use a small plate with a bit of a rim to it. Mix the spice and salt, pour oil over the spice & serve with raw veggies and slices of bread. Zingerman’s Bakehouse Paesano is always my go-to for dipping, but the True North or the Country Miche would also be a nice pairing.
&
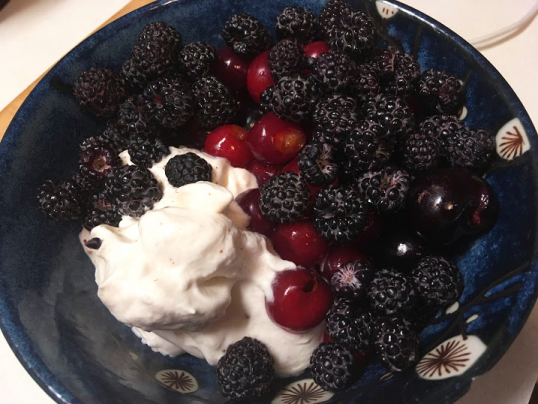

Fresh Cherries & Berries with Silk Road Blend Spiced Whipped Cream
(Yes I know this sounds a little unconventional, but I love the depth of flavor this ads to the whipped cream, and the fresh fruit! And with the price of vanilla still skyrocketing, it’s a fun alternative flavor.)
4 oz. heavy whipping cream
2 tsp. Silk Road Blend, finely grounded
3 tbsp. maple syrup
2 cups fresh berries or pitted cherries
Place heavy cream, maple syrup, and grounded Silk Road Blend into mixer. Beat on high until medium-to-stiff peaks form. You can also make this a shortcake style dessert by topping a slice of any Zingerman’s Bakehouse coffee cake with cherries and whipped cream. I had a Bumble Honey Cake in my freezer which I enjoyed. For something more neutral, you can use Sweet Butter Tea Cake, which the Bakehouse makes every so often, and I always love the Blueberry Buckle with this combination.
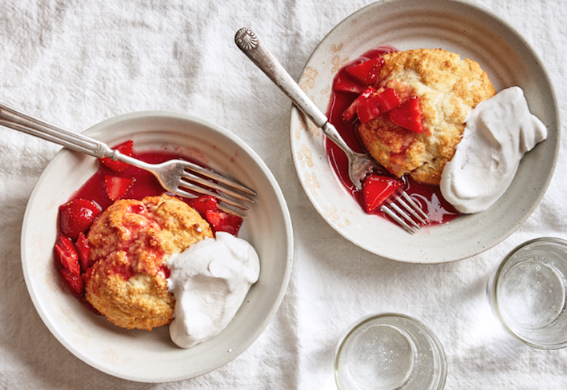
From the pages of our Zingerman’s Bakehouse cookbook, comes an ideal summer dessert for celebrating Independence Day, or any day. Tender homemade biscuits are the perfect partner for farmers market fresh berries or stone fruits, topped with whipped cream. Here’s the recipe!
Sweet Cream Drop Biscuit Recipe
Makes 12 biscuits
3 cups plus 2 Tbsp (440g) All-purpose flour
1/4 cup (55g) granulated sugar
2 Tbsp (28 g) baking Powder
1/2 tsp sea salt
1/2 cup plus 2 Tbsp (145g) unsalted butter, cold
1 cup (235g) whole milk, cold
1 cup (245g) heavy cream, cold
Demerara sugar for sprinkling tops
1. Preheat the oven 375ºF (190ºC)
2. In a large mixing bowl, combine the flour, sugar, baking powder, and salt. Mix with a wooden spoon to combine evenly.
3. Dice the cold butter into 1/2-in (1.5-cm) pieces and add to the dry ingredients. Using your fingers or a pastry blender, work the butter into the flour mixture until it’s reduced to pea sized pieces. It also helps to pick up the mixture and rub it together between your palms. This step is important for creating tender biscuits. The butter coats the grains of flour, making it less possible to form long gluten strands that would give the biscuits a chewy rather than tender texture.
4. Make a well in the center of the ingredients, and pour in the milk and heavy cream. Use a fork to gently mix the wet and dry ingredients together until homogenous. Let the mixture sit in the bowl for 15 minutes. This will allow the dry ingredient to fully absorb the wet ingredients without overmixing.
5. Using a 2-oz (59-ml) portioner or a 1/4-cup measure, drop level scoops of biscuit batter onto a sheet tray lined with parchment paper. Leave at least 3 in (7.5 cm) between the biscuits to allow for spreading during baking. Sprinkle Demerara sugar on the tops of the biscuits.
6. Bake the biscuits for 13 to 15 minutes or until golden brown on the bottom and edges. Let cool to room temperature before serving.
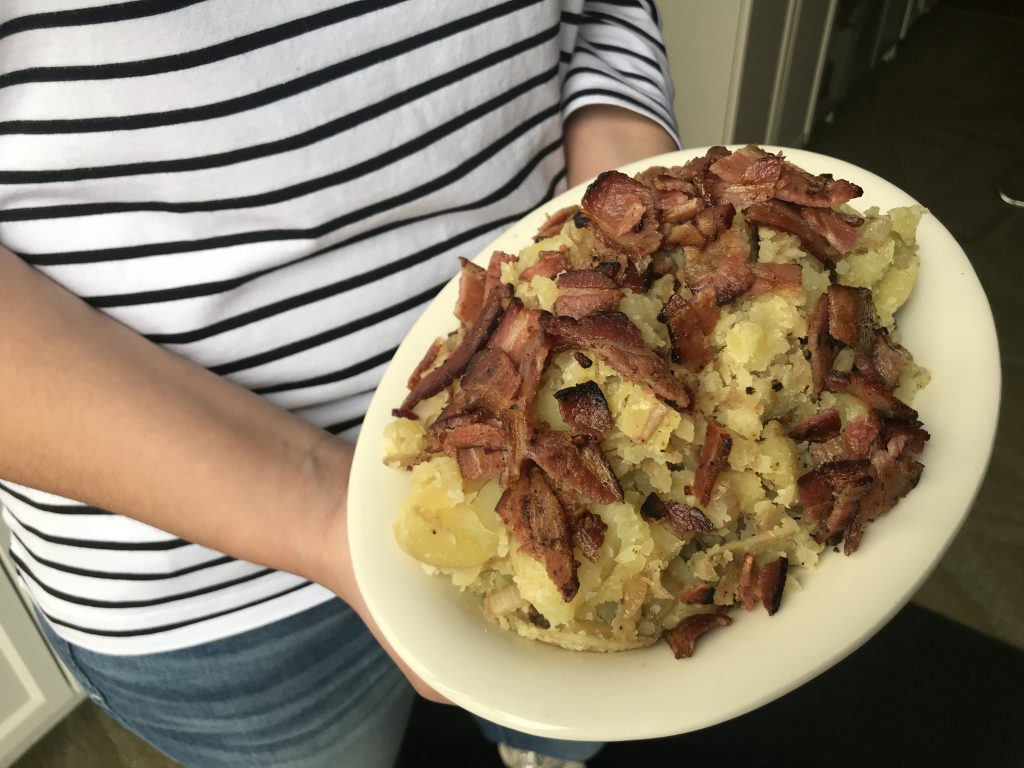
Ingredients:
1 lb Kolozsvari Bacon (available at Zingerman’s Deli)
1 lb Yukon Gold Potatoes, peeled and large diced
1 sweet onion, peeled and small diced
1 Tbsp White Wine Vinegar
2 tsp Sugar
1 1/2 tsp All Purpose Flour
1 tsp Salt
A dash of Tellicherry Black Pepper
Instructions:
1. Pre-heat oven to 400°F.
2. Add 1 tsp salt to water.
3. Bring salted water to a boil.
4. Add Yukon Gold Potatoes to boiling water and cook for 12 minutes (or until your desired tenderness).
5. Meanwhile, bake 1 lb of Kolozsvari in pre-heated oven for 20 minutes.
6. Remove potatoes from stovetop, strain, and add to a serving bowl.
7. Remove bacon from oven and place on a plate.
8. Add bacon fat from tray pan to a cast iron or sauté pan. Turn on burner to medium heat.
9. Add sweet onion to bacon fat. Stir continuously until tender and translucent.
10. Sprinkle flour over onions and stir in, continue to sauté for a few minutes till browned.
11. Sprinkle sugar over onions and stir.
12. Add white wine vinegar to pan to deglaze.
13. Scrape onions and sauce from pan into the serving bowl.
14. Crumble or chop of the bacon pieces. Add 3/4 of the bacon to the bowl.
15. Grind some fresh Tellicherry black pepper to taste add to the bowl.
16. Stir to combine.
17. Sprinkle remaining bacon on top. Serve warm.